
20 Essential Checks To Make Before Launching Your Squarespace Website

As approved Squarespace Specialists, the Manage My Website team builds a lot of websites on this platform every year, so taking care of those last checks before launch has become second nature to us.
Once you've finished the design and build, there are various "good housekeeping" procedures to follow and sometimes these can be difficult to keep track of.
Our instructions will be useful to those who have built their own websites and want to check that they have done everything they can to optimise them for the search engines. This checklist will also help you to make sure those final flourishes to tidy up your site have been accomplished.
1. Use Headings on your content
When adding content to Text Blocks, select Heading 1 or Heading 2 from the text format drop-down menu to organise your structure. These styles automatically create <h1> and <h2> tags in the page’s HTML, so there’s no need to add them manually.
Like titles, search engines typically give headings a higher priority. Clear headings that describe the content that follows make it easier for search engines to detect the major themes of your site. At the same time, they help visitors scan your page and quickly find the information they're looking for.

2. Page Titles and Descriptions
Go into your settings for each individual page of your website and make sure that you’ve completed the Page Titles and Descriptions for all of them.
You can ignore the Navigation Title as this is simply the words you’ve used for the main navigation on your site, however the Page Title will be read and displayed in Google search results, as will the Page Description. Keep both of them short and sweet, but informative enough to have a good impact on your SEO. Think of using your keywords naturally and effectively.
Each template uses Page Titles and Descriptions in a different way, so check your "Read Me" file in your Pages section for details about this.

3. Tags and Categories for Blogs, Galleries and Products
Search engines scan tags and categories to identify what products, blog posts, or gallery images are about. Adding tags and categories that accurately describe the item could help it appear in search results.

4. Business Information
This can be found in Settings/General/Business Information, and some templates will display all of the information that you disclose, so the name of your business, address, contact details, opening hours, etc.

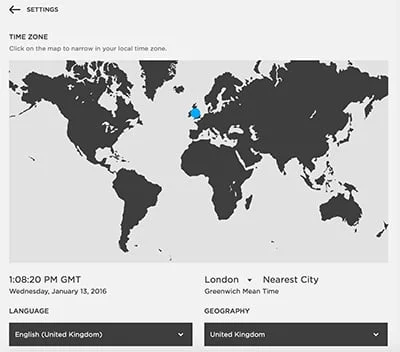
5. Regional Information
In Settings/General/Regional, access this area to update your location and time zone. This will be useful for pages such as your blog, where displaying the correct time that you posted an entry will be important. Nobody wants to look as though they’re posting at 3am!
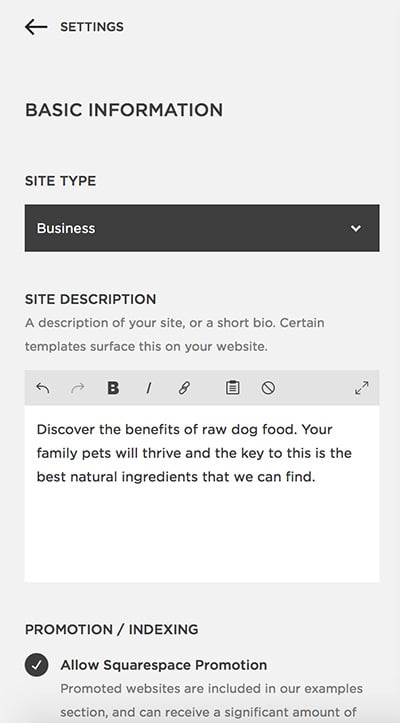
6. Basic Information
This can be found in Settings/Website/Basic Information and is a description of your site, or a short bio. Certain templates will show this on your website and it’s a good idea to make sure it’s completed.
You can also let Squarespace know what type of website you have – Business, Ecommerce, Non Profit or Personal.
There’s a checkbox for allowing Squarespace promotion here too. If you tick it you may find that Squarespace choose to list your site as a great example of the template you’ve chosen, which is invaluable for PR.
7. Connected Accounts for social media
If you haven’t connected up your social media accounts, make sure you do it at this stage before launch.
Go to Settings/Website/Connected Accounts and you’ll find the option there. You can then click on “Connect Account” and choose the ones you’d like Squarespace to link up. Make sure you have your usernames and passwords handy.

8. Marketing – SEO
Go to Setting/Website/Marketing and you’ll find a range of options to choose from.
Click on SEO and here you should describe your website in one or two short sentences. This description is used in the search results of search engines like Google.
Underneath you can change the way your page titles will be shown although in most cases you won’t need to alter the default settings.


9. Marketing- Pin It Buttons for Pinterest
Go to Setting/Website/Marketing/Pin It Buttons and if you’d like people to be able to easily pin your images onto Pinterest, enable this function. You can choose only blogs to have this facility, or your entire website.

10. 404 Error / Page Not Found Custom Page
This isn’t essential by any means, but it does add a nice touch. You can personalise your 404 Error page to make it friendly and approachable rather than a mistake when someone types in an old or incorrect URL relating to your site.
Simply add a new unlinked page with your chosen graphics and text, then go to Settings/Website/Advanced/404 Error / Page Not Found.
Here you can select the dropdown and choose the page you’d like people to land on.


11. Browser Icon (Favicon)
Go to Design/Logo & Title to access this area. If you have a logo, you’ll have been here before to upload it in the early stages of your website build as well as updating your site title.
Using the field for the Favicon, you can upload a browser URL icon for use with your site. This icon can be in PNG or ICO format and will be resized by the browser for display in your URL bar.
You need to make sure that your chosen icon/image is square shaped and not too detailed (as it really is tiny), and you can create a favicon here (select the 16x16 size).


12. Form Storage
Check that your contact form/other forms’ storage goes to the correct email address and and that it has a nice personal message rather than the default one.
You can access this by editing the form block, then clicking on Storage for the email address (or to link it to Mailchimp and Google Docs) and Advanced for the Post-Submit Message.


13. Labelling images - Alt Tags
This one can be time consuming but is good standard practice for all websites as it’s excellent for SEO if done properly. You need to consider people with their images turned off, slow internet connections, or sight problems who use screen readers. This text will display instead of the image. That means you should really describe each photograph, graphic or illustration on your website.

14. Set Image Focal Points
With focal points (the small grey circles that appear over images you're editing), you can control the focus area in your images.
In many cases, the system will crop an image so it fits neatly in your template or its container. When you move a focal point in an image, you reposition the image within its container and adjust what displays in the cropped area. For example you may want it to focus on someone's face, or another specific part of an image.
Simply go to the image you'd like to edit, and drag the small circle to the area you'd like to highlight to ensure it doens't get cropped in the wrong place.

15. Footer text
If you'd like to add a standard footer message, perhaps with a copyright statement too, hover over the footer and click on Edit.

16. Social Sharing Logo
You can access this area via Design/Logo & Title.
Adding a Social Sharing Logo ensures that you can always include an image in social posts linking to your content, even if the page you're sharing doesn't have images on it.
Note: Facebook and other social networks occasionally pull images from cached versions of your site. Squarespace tags the images listed below to help the social network surface them, but the final selection of the posted image is controlled by the social network, not Squarespace.

17. Facebook Object Debugger for sharing pages
Sometimes it's only after you've launched your website and want to tell the world that you realise Facebook is either picking up the wrong thumbnail, or no image at all.
The Facebook Open Graph Object Debugger is a free tool that allows you to preview and understand how your page will look when shared on Facebook. It also allows you to change its cache and force the changes you would like to make.
Enter the page URL you'd like to check and select 'Show existing scrape information'. At the bottom of the results you'll find a preview of what Facebook has recorded and how your post will be shared.
From there you can go back to your website to edit your image accordingly if it's cropped oddly and alter your page title and description if required.
At this stage, you can return to the Object Debugger and select 'Fetch new scrape information'. You may need to click the button a couple of times for a proper refresh of the page.
Note: Images shared on Facebook should be at least 200px × 200px. However, Facebook changes this frequently. If your image appears cropped, Squarespace recommend experimenting with image sizes for current best practices. For more help, visit Facebook's documentation.


18. Custom Domain
And finally, in order to use your "proper" domain name and not have a standard Squarespace one, there are various steps you need to follow.

19. Have one final, thorough check of your entire website before you start promoting it
As well as everything we've listed in this article, you need to make sure you've done the following:
- Conducted cross-browser checks to make sure your new website displays correctly across all browsers and devices
- Proofread your content once more time
- Checked all links - do they work? Do all links to external sites open in a new window?
- Tested your functionality to make sure nothing is broken or not working as it should
- Integrate Google Analytics if you'd like to keep track of your statistics
- Make sure that all your images optimised for the web and load quickly
20. Register your website with the search engines
If you’ve just launched your site or have made some major changes to it, Google and Bing offer search tools to help you manage your site's search presence. You can request that a search engine re-index your content by using these services.
• Verifying your site with Google Search Console
• Verifying your site with Bing Webmaster Tools
I hope this article has helped you! If you have anything to add or ask, just get in touch or leave a comment below and we'll be happy to speak to you.